Table of Contents:
Choosing the Right Lighting for Furniture Photography
Choosing the right lighting for furniture photography is crucial in showcasing the beauty and design of each piece. Lighting can dramatically alter the perception of color, texture, and form, making it an essential factor in your photographic setup.
Here are some key considerations:
- Natural Light: Utilizing natural light can create a soft and inviting atmosphere. Early morning or late afternoon light is often ideal, as it provides a warm glow without harsh shadows. Position your furniture near windows to maximize this effect.
- Artificial Light: If natural light is not available, consider using softbox lights or LED panels. These options allow for greater control over brightness and color temperature. Aim for a color temperature of around 5000K to mimic daylight.
- Light Direction: Experiment with different angles of light to find what best highlights your furniture's features. Side lighting can accentuate textures, while backlighting can create dramatic silhouettes.
- Avoiding Reflections: If your furniture has glossy surfaces, be mindful of reflections. Use diffusers or adjust your lighting angles to minimize unwanted glare.
- Three-Point Lighting: This technique involves using a key light, fill light, and backlight to create depth and dimension. The key light is the primary source, the fill light softens shadows, and the backlight adds separation from the background.
By carefully selecting and positioning your lighting, you can create stunning images that truly showcase the elegance and craftsmanship of designer furniture.
Setting the Scene: Backgrounds and Props
Setting the scene effectively is vital for capturing stunning images of designer furniture. The right background and props can enhance the overall aesthetic and draw attention to the furniture's unique features.
Here are some strategies to consider:
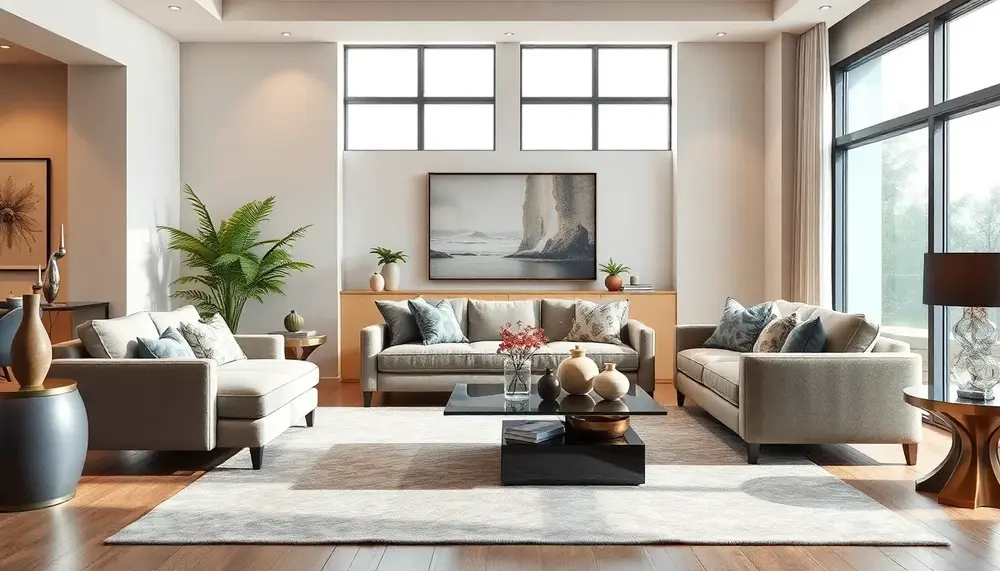
- Background Selection: Choose backgrounds that complement the furniture without overpowering it. Neutral colors like white, gray, or beige often work best, allowing the furniture to stand out. For a more dynamic look, consider textured backgrounds like wood or brick.
- Using Props: Incorporate props that enhance the story you want to tell. This could include decorative items like vases, books, or plants that resonate with the furniture's style. Ensure that props are not too distracting and maintain a cohesive theme.
- Creating Depth: Layer your scene by placing items at varying distances from the camera. This technique can create a sense of depth, making the photograph more engaging. For example, position a plant closer to the camera and the furniture further back.
- Consistency in Style: Keep a consistent style across your photos. If you're showcasing modern furniture, avoid using rustic props that might clash with the contemporary aesthetic. Every element in the frame should align with the furniture's design language.
- Negative Space: Utilize negative space strategically to draw focus to the furniture. This involves leaving empty areas in the frame, which can enhance the visual impact of the main subject.
By thoughtfully selecting backgrounds and props, you can create an environment that not only highlights the furniture but also tells a compelling story, enhancing the overall appeal of your photography.
Angles That Highlight Design Features
When it comes to showcasing designer furniture, the angles you choose can make all the difference in highlighting its unique design features. Selecting the right perspective not only enhances visual interest but also emphasizes the craftsmanship and functionality of each piece.
Here are some effective techniques to consider when positioning your camera:
- Eye Level Shots: Taking photos at eye level provides a natural perspective that feels inviting. This angle is particularly effective for capturing the proportions and comfort of seating options like sofas and chairs.
- Low Angles: Shooting from a lower angle can create a sense of grandeur and emphasize the height and design elements of furniture. This technique works well for tall items like bookshelves or statement pieces that you want to showcase as focal points.
- High Angles: A high-angle shot can offer a unique view of the furniture layout, especially in spaces where multiple pieces interact. This perspective can help illustrate how the furniture fits within its environment, making it easier for potential buyers to visualize its use.
- Close-Up Shots: Focus on specific design features like textures, materials, or intricate details. Close-ups can convey the quality and craftsmanship of the furniture, providing potential customers with a better understanding of what makes the piece special.
- Dynamic Angles: Experimenting with angles that are not strictly horizontal or vertical can add energy to your images. Tilted angles can evoke a modern, artistic feel, making the furniture appear more dynamic and engaging.
By thoughtfully considering the angles from which you capture your furniture, you can create compelling images that not only showcase the design features but also resonate with potential buyers, helping them envision the pieces in their own spaces.
Using Natural Light vs. Artificial Light
When deciding between natural light and artificial light for furniture photography, understanding the strengths and weaknesses of each option can significantly impact the quality of your images.
Natural Light: This is often the preferred choice for many photographers due to its soft, flattering qualities. Natural light can bring out the true colors of the furniture and highlight textures in a way that feels organic. Here are some advantages:
- Soft Shadows: Natural light creates gentle shadows, which can add depth without overwhelming the subject.
- Color Accuracy: It tends to provide more accurate color reproduction, making the furniture look true to life.
- Dynamic Range: The varying qualities of natural light throughout the day can provide different moods, from warm morning light to the cool tones of twilight.
However, natural light can be unpredictable. Weather conditions and time of day can alter the quality of light, making it challenging to achieve consistent results.
Artificial Light: This option offers greater control over the lighting environment. Photographers can manipulate the intensity and direction of light, which is particularly beneficial for studio settings. Consider these points:
- Consistency: With artificial lighting, you can maintain a uniform look across multiple shots, regardless of external conditions.
- Versatility: Different types of artificial lights, such as LED or tungsten, can be used to achieve specific effects and moods.
- Extended Shooting Time: You are not limited by daylight, allowing for shooting at any time, which can be especially useful for complex setups.
Ultimately, the choice between natural and artificial light should be guided by the desired outcome of your photos. Many photographers find a combination of both to be most effective, using natural light for its beauty while supplementing with artificial sources to fill in shadows or enhance certain features.
Editing Techniques to Enhance Furniture Photos
Editing techniques play a vital role in enhancing furniture photos, transforming them from simple images into captivating visuals that attract potential buyers. By applying the right editing strategies, you can emphasize the unique qualities of each piece and create a cohesive look across your portfolio.
Here are some essential editing techniques to consider:
- Color Correction: Adjusting the color balance ensures that the furniture appears true to life. Use tools to correct any color casts and enhance the vibrancy of the hues, making the furniture more appealing.
- Exposure Adjustments: Fine-tune the exposure to ensure that the details are visible without washing out the colors. This can help in balancing highlights and shadows, creating a more dynamic image.
- Sharpening: Apply sharpening selectively to enhance the details of the furniture. This technique can help highlight textures and craftsmanship, making the piece stand out more prominently.
- Background Cleanup: If there are distracting elements in the background, use cloning or healing tools to clean them up. A clutter-free background allows the furniture to take center stage.
- Vignette Effects: Adding a subtle vignette can draw attention to the furniture by darkening the edges of the image. This technique helps focus the viewer's eye on the main subject.
- Crop and Frame: Experiment with cropping to improve composition. A well-cropped image can enhance the overall balance and impact, ensuring that the furniture is presented in the best light.
Incorporating these editing techniques can significantly elevate your furniture photography. By enhancing colors, correcting exposure, and refining the overall presentation, you can create stunning images that not only showcase the beauty of designer furniture but also resonate with your audience.
Creating a Cohesive Style in Your Shots
Creating a cohesive style in your furniture shots is essential for establishing a strong visual identity and enhancing the overall appeal of your images. A well-executed cohesive style not only showcases the furniture effectively but also communicates a specific aesthetic or theme that resonates with your target audience.
Here are some tips to help you achieve a unified look in your photography:
- Consistent Color Palette: Choose a color scheme that complements the furniture. Using similar colors in backgrounds, props, and accessories can create a harmonious look. This approach can evoke a particular mood, whether it’s warm and inviting or sleek and modern.
- Styling Themes: Develop a specific theme for your photoshoots. Whether it’s minimalist, rustic, or bohemian, sticking to a theme helps create a recognizable style. Make sure all elements in the shot align with this theme to reinforce the overall message.
- Uniform Lighting: Maintain consistent lighting across your shots. Whether you prefer natural or artificial light, using the same source and intensity will help unify your images. This consistency is crucial for creating a professional look and feel.
- Complementary Props: Select props that enhance rather than distract from the furniture. These should align with your theme and color palette. For instance, if your furniture is modern, use sleek, contemporary accessories; if it’s vintage, opt for items that reflect that era.
- Repetitive Elements: Incorporating repetitive design elements, such as shapes or textures, can help tie different images together. This could be a specific fabric used in cushions or a recurring motif in decorative items.
By focusing on these aspects, you can create a cohesive style in your furniture photography that not only showcases the beauty of each piece but also engages your audience and strengthens your brand identity.
Showcasing Functionality: How to Use Furniture in Context
Showcasing functionality is a critical aspect of furniture photography, as it allows potential buyers to visualize how each piece will fit into their daily lives. By demonstrating the practical uses of furniture within a specific context, you can create compelling images that resonate with your audience.
Here are some effective strategies for using furniture in context:
- Real-Life Scenarios: Capture furniture in action by staging real-life scenarios. For example, arrange a living room with people enjoying the sofa or a dining table set for a meal. This helps viewers imagine themselves using the furniture in their own homes.
- Highlighting Versatility: If a piece has multiple functions, such as a sofa bed or a convertible table, showcase these features through a series of images. Display how the furniture can adapt to different situations, emphasizing its practicality.
- Contextual Settings: Use environments that reflect the intended use of the furniture. For instance, place outdoor furniture in a garden setting or workspace furniture in a home office. This contextualization helps potential buyers visualize how the furniture integrates into their lifestyles.
- Incorporating Accessories: Use accessories that enhance the functionality of the furniture. For example, adding decorative cushions to a sofa or placing a stylish lamp on a side table can provide visual cues about comfort and usability.
- Demonstrating Scale: Include elements that help demonstrate the scale of the furniture. For instance, showing a person sitting on a chair or standing next to a shelving unit can provide a clear sense of size and proportion, making it easier for viewers to gauge how the piece will fit in their own spaces.
By thoughtfully showcasing functionality, you not only highlight the aesthetic appeal of the furniture but also convey its practical benefits, helping potential customers make informed decisions.
Incorporating Textures and Colors Effectively
Incorporating textures and colors effectively is key to creating visually appealing furniture photography. By strategically selecting and combining various elements, you can enhance the overall aesthetic of your images, making them more engaging and inviting.
Here are some effective strategies for achieving this:
- Layering Textures: Introduce different textures to add depth to your photos. For example, pair a sleek leather sofa with a soft knitted throw or a wooden coffee table with a glass vase. This contrast creates visual interest and highlights the unique characteristics of each material.
- Complementary Colors: Use a color wheel to find colors that complement each other. For instance, if your furniture is in neutral tones, consider adding pops of color through accessories like cushions, artwork, or decorative items. This approach can create a balanced and harmonious look.
- Monochromatic Schemes: Alternatively, a monochromatic color scheme can evoke a sophisticated feel. Using varying shades of a single color can create a serene and cohesive atmosphere, allowing the furniture to shine without distraction.
- Accent Features: Highlight specific features of the furniture by coordinating the surrounding colors and textures. For example, if a piece has a unique pattern or finish, ensure that the backdrop and props enhance rather than compete with these features.
- Natural Elements: Incorporating natural elements such as plants or wooden accents can bring warmth to your photos. Greenery not only adds color but also creates a lively environment that resonates with the organic feel of the furniture.
By thoughtfully integrating textures and colors, you can create furniture photographs that are not only aesthetically pleasing but also showcase the pieces in a way that appeals to potential buyers, making them more likely to envision these items in their own spaces.
Capturing Details: Close-Up Shots of Craftsmanship
Capturing the intricate details of craftsmanship in furniture photography is essential for showcasing the quality and artistry behind each piece. Close-up shots allow potential buyers to appreciate the fine workmanship and materials that make the furniture unique.
To effectively highlight craftsmanship through close-up photography, consider the following techniques:
- Focus on Unique Features: Identify and emphasize distinctive elements such as stitching, wood grain, or joinery techniques. These details not only tell a story about the furniture's construction but also reflect the skill of the designer or craftsman.
- Use Macro Lenses: Employ macro photography techniques to capture fine details that are often overlooked. A macro lens allows you to get up close and personal with textures and patterns, revealing the beauty in the small things.
- Lighting for Detail: Pay careful attention to lighting when taking close-up shots. Soft, diffused light can help illuminate textures without creating harsh shadows. Consider using reflectors to bounce light into shadows, enhancing the visibility of intricate details.
- Background Considerations: Ensure that the background does not distract from the main focus of the close-up. Use neutral or complementary colors that allow the craftsmanship to shine. A blurred background can also help isolate the subject and draw attention to its features.
- Angles Matter: Experiment with different angles to find the most flattering perspective for the details you want to highlight. A slight tilt or rotation can reveal more about the furniture's structure and design, making the shot more dynamic.
By focusing on these aspects when capturing close-up shots, you can create powerful images that not only showcase the craftsmanship but also evoke an emotional connection with potential buyers, encouraging them to appreciate the quality and artistry of the furniture.
Styling Tips for Outdoor Furniture Photography
Styling outdoor furniture photography requires a thoughtful approach to highlight the beauty and functionality of each piece while creating a welcoming atmosphere. Here are some effective tips to consider:
- Choose the Right Location: Select a location that enhances the outdoor setting, such as a garden, patio, or balcony. Natural surroundings like greenery or water features can add context and beauty to the images.
- Time of Day: The golden hours—shortly after sunrise or before sunset—provide soft, flattering light. This helps to create a warm ambiance that enhances the colors and textures of the outdoor furniture.
- Incorporate Natural Elements: Use elements like plants, flowers, or outdoor decor to complement the furniture. This not only adds visual interest but also helps to create a cohesive outdoor living space.
- Show Usage: Capture the furniture in use. Photographing people enjoying the outdoor space can convey a sense of lifestyle and comfort, making it easier for potential buyers to imagine themselves in that setting.
- Accessorize Thoughtfully: Use outdoor accessories like cushions, throws, and table settings to style the furniture. These elements can enhance the overall aesthetic and showcase the furniture's functionality.
- Maintain Cleanliness: Ensure that the outdoor space is tidy and well-maintained. Remove any clutter or distractions that might detract from the focus on the furniture.
- Experiment with Angles: Try various angles to find the most flattering perspectives for outdoor furniture. Low angles can create a sense of grandeur, while high angles can showcase the layout of the space.
By applying these styling tips, you can create stunning outdoor furniture photography that highlights both the beauty and practicality of the pieces, inviting potential customers to envision them in their own outdoor spaces.
Utilizing Negative Space in Furniture Images
Utilizing negative space in furniture images is a powerful technique that can enhance the overall composition and impact of your photographs. Negative space refers to the empty areas surrounding your subject, and when used effectively, it can create balance, highlight the furniture, and evoke a sense of tranquility.
Here are some key strategies for incorporating negative space in your furniture photography:
- Emphasize the Subject: By leaving ample negative space around your furniture, you draw attention to the piece itself. This minimalist approach allows viewers to focus on the design, color, and texture without distractions.
- Create Balance: Use negative space to achieve a sense of harmony in your composition. Position your furniture off-center and allow the empty space to fill the frame, creating a more dynamic and visually appealing image.
- Enhance Mood: The use of negative space can evoke various emotions. A spacious, airy feel can suggest relaxation and openness, while tighter compositions can create intimacy. Choose your spacing based on the mood you wish to convey.
- Incorporate Context: Use negative space to provide context for the furniture. By including elements of the surrounding environment—such as a patio, garden, or living room—you can tell a story while still maintaining focus on the furniture piece.
- Experiment with Scale: Play with the relationship between the furniture and the negative space to illustrate scale. A large piece of furniture against a vast empty background can emphasize its size, while smaller items can appear cozy and inviting.
By effectively utilizing negative space in your furniture images, you can enhance visual storytelling and create striking photographs that captivate your audience, making your designs stand out in a competitive market.
The Importance of Consistency in Branding Photos
The importance of consistency in branding photos cannot be overstated, especially in the realm of furniture design. Consistency helps establish a recognizable identity that resonates with consumers and reinforces brand values across various platforms.
Here are several key aspects to consider when aiming for consistency in your branding photos:
- Visual Identity: A cohesive visual identity encompasses color schemes, typography, and imagery styles that reflect the brand's personality. Consistent use of these elements across all photos ensures that the audience can easily identify the brand at a glance.
- Brand Storytelling: Each photo should contribute to the brand narrative. By maintaining a consistent theme and style, you can effectively communicate the lifestyle and values associated with the furniture, making the brand more relatable and appealing.
- Target Audience Engagement: Consistency in branding photos helps in building trust with your target audience. When customers see a unified look, they are more likely to perceive the brand as reliable and professional, encouraging loyalty and repeat business.
- Cross-Platform Recognition: Whether on social media, websites, or print materials, a consistent look ensures that customers recognize the brand regardless of where they encounter it. This recognition can be a decisive factor in consumer decision-making.
- Professionalism: High-quality, consistent images convey professionalism and attention to detail. This not only enhances the perceived value of the furniture but also reflects the brand's commitment to quality.
In conclusion, prioritizing consistency in branding photos is essential for creating a strong and memorable brand presence in the furniture market. By ensuring that all visual content aligns with the brand's identity and values, businesses can foster trust, recognition, and engagement among their audience.
Using Models to Showcase Scale and Use
Using models to showcase scale and use in furniture photography is a powerful way to convey the functionality and appeal of each piece. Models provide a relatable context that helps potential buyers visualize how furniture fits into their daily lives.
Here are some effective strategies for incorporating models into your furniture photography:
- Demonstrating Scale: Models can help convey the size of furniture pieces, making it easier for viewers to understand their proportions. By positioning a model next to or interacting with the furniture, you create a visual reference that indicates how the item fits within a space.
- Highlighting Usage: Showcasing models using the furniture in real-life scenarios can illustrate its functionality. For example, capturing a model lounging on a sofa or dining at a table can effectively communicate the intended use and comfort level of the pieces.
- Creating Lifestyle Context: Models can help create an aspirational lifestyle that resonates with your target audience. By styling the scene to reflect a specific lifestyle—such as a cozy family gathering or an elegant dinner party—you encourage potential buyers to imagine themselves in that setting.
- Diversity in Representation: Including a diverse range of models can broaden the appeal of your furniture. This approach not only reflects inclusivity but also allows different consumers to see themselves in the images, enhancing the relatability of the brand.
- Natural Interaction: Capture candid moments of models interacting with the furniture. This could include laughing, reading, or relaxing, which can evoke emotions and create a connection with the audience, making the furniture feel more inviting.
By thoughtfully incorporating models into your furniture photography, you can create compelling images that effectively showcase the scale and usability of each piece, ultimately enhancing the appeal of your brand and encouraging consumer engagement.
Planning a Photoshoot: From Concept to Execution
Planning a photoshoot for furniture photography involves a comprehensive approach that ensures every detail aligns with your creative vision. From concept to execution, careful planning can elevate the quality of your images and effectively communicate your brand's message.
Here are essential steps to consider during the planning phase:
- Define Your Concept: Start by establishing a clear concept that reflects the style and functionality of the furniture. Consider the mood you want to convey—whether it's cozy, modern, or elegant—and plan your shoot around this theme.
- Scout Locations: Choose locations that complement your furniture. Whether it's a bright, airy room or an outdoor setting, the environment should enhance the overall aesthetic. Take into account lighting conditions, accessibility, and background elements.
- Prepare a Shot List: Create a detailed shot list that outlines each image you want to capture. Include various angles, close-ups, and contextual shots that demonstrate the furniture's functionality. This list will help keep the shoot organized and focused.
- Gather Props and Accessories: Select props that align with your concept and enhance the scene without overwhelming the furniture. Items like cushions, throws, or decorative objects can add layers of interest and context to your images.
- Assemble Your Team: If you're working with a team, ensure everyone understands the concept and their roles. This may include a photographer, stylist, models, and anyone responsible for setting up the scene. Clear communication is key to a smooth shoot.
- Timing and Scheduling: Plan your shoot for a time when natural light is at its best, or schedule artificial lighting setups accordingly. Allocate enough time for each shot and allow for flexibility in case adjustments are needed.
- Test Shots: Before the actual shoot, take a few test shots to assess lighting, angles, and composition. This allows you to make necessary adjustments and ensures that you're ready to capture the best images when it counts.
By following these steps in your planning process, you can create a well-organized and effective photoshoot that showcases your furniture beautifully, engages your audience, and strengthens your brand identity.
Post-Production: Final Touches for Stunning Images
Post-production is a crucial step in furniture photography that can elevate your images from good to stunning. This phase involves a range of editing techniques that enhance the visual appeal and ensure the final images align with your brand's aesthetic.
Here are some essential final touches to consider during post-production:
- Color Grading: Adjust the overall color balance to ensure consistency across your images. This may involve enhancing specific hues to match your brand's color palette or correcting any color casts that may have occurred during shooting.
- Retouching: Clean up any imperfections or distractions in the image. This can include removing dust spots, scratches, or blemishes on the furniture, as well as smoothing out backgrounds to create a polished look.
- Contrast and Brightness Adjustments: Fine-tune the contrast and brightness to enhance the depth and dimension of the furniture. This can help make textures more pronounced and create a more dynamic image.
- Sharpening Details: Apply sharpening selectively to emphasize the textures of the furniture without introducing noise. This is particularly effective in close-up shots where details play a significant role in showcasing craftsmanship.
- Creating a Consistent Look: Ensure that all images maintain a similar style by applying consistent filters or presets. This helps create a unified portfolio that is visually appealing and reinforces your brand identity.
- Export Settings: Choose the appropriate file format and resolution based on where the images will be used. For web use, ensure images are optimized for fast loading without sacrificing quality, while print images should be in higher resolution to retain detail.
By implementing these post-production techniques, you can significantly enhance your furniture images, making them more attractive and effective in capturing the attention of potential buyers.
FAQ About Capturing Designer Furniture in Photography
What is the best lighting for photographing designer furniture?
Natural light is often preferred for its soft, flattering qualities, but artificial lighting can provide consistency and control. A combination of both is typically the best approach.
How can I effectively showcase textures and materials in furniture photography?
Using close-up shots, varying lighting angles, and incorporating different textures in the scene can help highlight the unique materials and craftsmanship of the furniture.
What backgrounds work best for furniture photography?
Neutral backgrounds like white, gray, or beige often complement designer furniture without being distracting. Textured backgrounds, such as wood or brick, can also enhance the visual interest.
Why is showcasing functionality important in furniture photography?
Showcasing functionality allows potential buyers to visualize how the furniture fits into their lives, making it easier for them to connect emotionally with the pieces.
How can I create a cohesive style in my furniture photos?
Maintaining a consistent color palette, using uniform lighting, and incorporating complementary props can all contribute to a cohesive photographic style that showcases your furniture effectively.


